vue-resource 实现 get, post, jsonp请求 (vue发送ajax请求)
除了 vue-resource 之外,还可以使用 axios 的第三方包实现实现数据的请求
- 之前的学习中,如何发起数据请求?jQuery
- 常见的数据请求类型? get post jsonp
- 测试的URL请求资源地址:
- get请求地址: http://vue.studyit.io/api/getlunbo
- post请求地址:http://vue.studyit.io/api/post
- jsonp请求地址:http://vue.studyit.io/api/jsonp
4.JSONP的实现原理
- 由于浏览器的安全性限制,不允许AJAX访问 协议不同、域名不同、端口号不同的 数据接口,浏览器认为这种访问不安全;
- 可以通过动态创建script标签的形式,把script标签的src属性,指向数据接口的地址,因为script标签不存在跨域限制,这种数据获取方式,称作JSONP(注意:根据JSONP的实现原理,知晓,JSONP只支持Get请求);
- 具体实现过程:
- 先在客户端定义一个回调方法,预定义对数据的操作;
- 再把这个回调方法的名称,通过URL传参的形式,提交到服务器的数据接口;
- 服务器数据接口组织好要发送给客户端的数据,再拿着客户端传递过来的回调方法名称,拼接出一个调用这个方法的字符串,发送给客户端去解析执行;
- 客户端拿到服务器返回的字符串之后,当作Script脚本去解析执行,这样就能够拿到JSONP的数据了;
- 带大家通过 Node.js ,来手动实现一个JSONP的请求例子;
    const http = require('http');
    // 导入解析 URL 地址的核心模块
    const urlModule = require('url');

    const server = http.createServer();
    // 监听 服务器的 request 请求事件,处理每个请求
    server.on('request', (req, res) => {
      const url = req.url;

      // 解析客户端请求的URL地址
      var info = urlModule.parse(url, true);

      // 如果请求的 URL 地址是 /getjsonp ,则表示要获取JSONP类型的数据
      if (info.pathname === '/getjsonp') {
        // 获取客户端指定的回调函数的名称
        var cbName = info.query.callback;
        // 手动拼接要返回给客户端的数据对象
        var data = {
          name: 'zs',
          age: 22,
          gender: '男',
          hobby: ['吃饭', '睡觉', '运动']
        }
        // 拼接出一个方法的调用,在调用这个方法的时候,把要发送给客户端的数据,序列化为字符串,作为参数传递给这个调用的方法:
        var result = `${cbName}(${JSON.stringify(data)})`;
        // 将拼接好的方法的调用,返回给客户端去解析执行
        res.end(result);
      } else {
        res.end('404');
      }
    });

    server.listen(3000, () => {
      console.log('server running at http://127.0.0.1:3000');
    });
5.vue-resource 的配置步骤:
- 直接在页面中,通过
script标签,引入vue-resource的脚本文件; - 注意:引用的先后顺序是:先引用
Vue的脚本文件,再引用vue-resource的脚本文件;
<!DOCTYPE html>
<html lang="en">
<head>
  <meta charset="UTF-8">
  <meta name="viewport" content="width=device-width, initial-scale=1.0">
  <meta http-equiv="X-UA-Compatible" content="ie=edge">
  <title>Document</title>
  <script src="./lib/vue-2.4.0.js"></script>
  <!-- 注意:vue-resource 依赖于 Vue,所以先后顺序要注意  -->
  <!-- this.$http.jsonp -->
  <script src="./lib/vue-resource-1.3.4.js"></script>
</head>
<body>
  <div id="app">
    <input type="button" value="get请求" @click="getInfo">
    <input type="button" value="post请求" @click="postInfo">
    <input type="button" value="jsonp请求" @click="jsonpInfo">
  </div>

  <script>
    // 创建 Vue 实例,得到 ViewModel
    var vm = new Vue({
      el: '#app',
      data: {},
      methods: {
        getInfo() { // 发起get请求
          //  参数1: 要请求的URL地址
          //  参数2: 要发送的数据对象   更多参考文档 https://github.com/pagekit/vue-resource
          //  当发起get请求之后, 通过 .then 来设置成功的回调函数
          this.$http.get('http://vue.studyit.io/api/getlunbo').then(function (result) {
            // 通过 result.body 拿到服务器返回的成功的数据
            // console.log(result.body)
          })
        },
        postInfo() { // 发起 post 请求   application/x-wwww-form-urlencoded
          //  手动发起的 Post 请求,默认没有表单格式,所以,有的服务器处理不了
          //  通过 post 方法的第三个参数, { emulateJSON: true } 设置 提交的内容类型 为 普通表单数据格式
          //  参数1: 要请求的URL地址
          //  参数2: 要发送的数据对象
          //  参数3: 指定post提交的编码类型为 application/x-www-form-urlencoded   更多参考文档 https://github.com/pagekit/vue-resource
          this.$http.post('http://vue.studyit.io/api/post', {}, { emulateJSON: true }).then(result => {
            console.log(result.body)
          })
        },
        jsonpInfo() { // 发起JSONP 请求
          //  参数1: 要请求的URL地址
          //  参数2: 要发送的数据对象   更多参考文档 https://github.com/pagekit/vue-resource
          this.$http.jsonp('http://vue.studyit.io/api/jsonp').then(result => {
            console.log(result.body)
          })
        }
      }
    });
  </script>

</body>
</html>
使用vue-resource 完成品牌管理案例
展示品牌列表
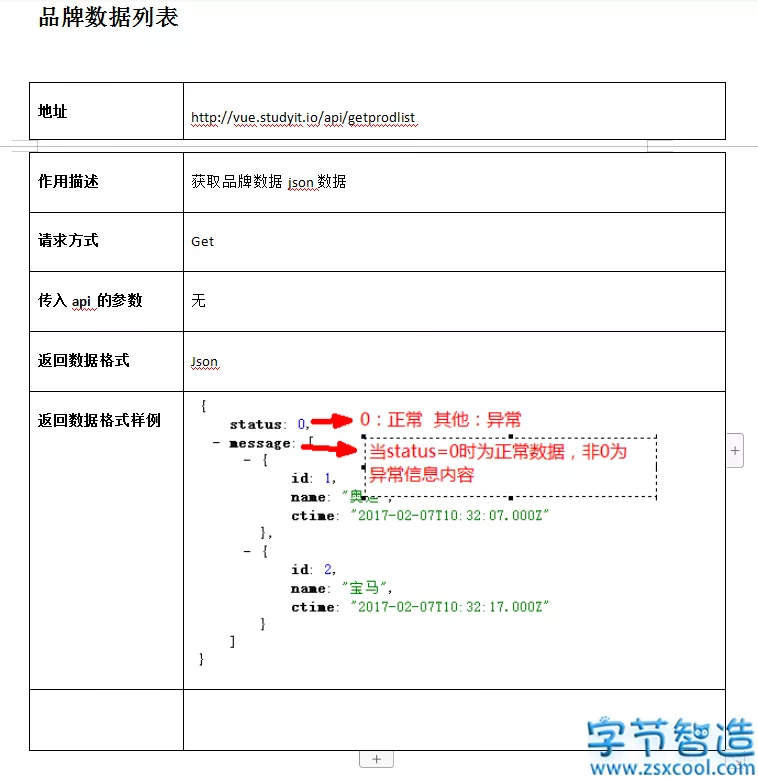
品牌数据列表接口文档
代码实现
<!DOCTYPE html>
<html lang="en">
<head>
  <meta charset="UTF-8">
  <meta name="viewport" content="width=device-width, initial-scale=1.0">
  <meta http-equiv="X-UA-Compatible" content="ie=edge">
  <title>Document</title>
  <script src="./lib/vue-2.4.0.js"></script>
  <script src="./lib/vue-resource-1.3.4.js"></script>
  <link rel="stylesheet" href="./lib/bootstrap-3.3.7.css" rel="nofollow noopener"  rel="nofollow noopener"  rel="nofollow noopener"  rel="nofollow noopener" >
</head>
<body>
  <div id="app">
    <div class="panel panel-primary">
      <div class="panel-heading">
        <h3 class="panel-title">添加品牌</h3>
      </div>
      <div class="panel-body form-inline">

        <label>
          Name:
          <input type="text" v-model="name" class="form-control">
        </label>

        <input type="button" value="添加" @click="add" class="btn btn-primary">
      </div>
    </div>

    <table class="table table-bordered table-hover table-striped">
      <thead>
        <tr>
          <th>Id</th>
          <th>Name</th>
          <th>Ctime</th>
          <th>Operation</th>
        </tr>
      </thead>
      <tbody>
        <tr v-for="item in list" :key="item.id">
          <td>{{item.id}}</td>
          <td>{{item.name}}</td>
          <td>{{item.ctime}}</td>
          <td>
            <a href="" rel="nofollow noopener"  rel="nofollow noopener"  rel="nofollow noopener"  rel="nofollow noopener"  @click.prevent="del(item.id)">删除</a>
          </td>
        </tr>
      </tbody>
    </table>
  </div>

  <script>
    // 如果我们通过全局配置了,请求的数据接口 根域名,则 ,在每次单独发起 http 请求的时候,请求的 url 路径,应该以相对路径开头,前面不能带 /  ,否则 不会启用根路径做拼接;
    Vue.http.options.root = 'http://vue.studyit.io/';
    // 全局启用 emulateJSON 选项
    Vue.http.options.emulateJSON = true;

    // 创建 Vue 实例,得到 ViewModel
    var vm = new Vue({
      el: '#app',
      data: {
        name: '',
        list: [ // 存放所有品牌列表的数组
        ]
      },
      created() { // 当 vm 实例 的 data 和 methods 初始化完毕后,vm实例会自动执行created 这个生命周期函数
        this.getAllList()
      },
      methods: {
        getAllList() { // 获取所有的品牌列表
          // 分析:
          // 1. 由于已经导入了 Vue-resource这个包,所以 ,可以直接通过  this.$http 来发起数据请求
          // 2. 根据接口API文档,知道,获取列表的时候,应该发起一个 get 请求
          // 3. this.$http.get('url').then(function(result){})
          // 4. 当通过 then 指定回调函数之后,在回调函数中,可以拿到数据服务器返回的 result
          // 5. 先判断 result.status 是否等于0,如果等于0,就成功了,可以 把 result.message 赋值给 this.list ; 如果不等于0,可以弹框提醒,获取数据失败!

          this.$http.get('api/getprodlist').then(result => {
            // 注意: 通过 $http 获取到的数据,都在 result.body 中放着
            var result = result.body
            if (result.status === 0) {
              // 成功了
              this.list = result.message
            } else {
              // 失败了
              alert('获取数据失败!')
            }
          })
        },}
    });
  </script>
</body>
</html>
添加品牌数据
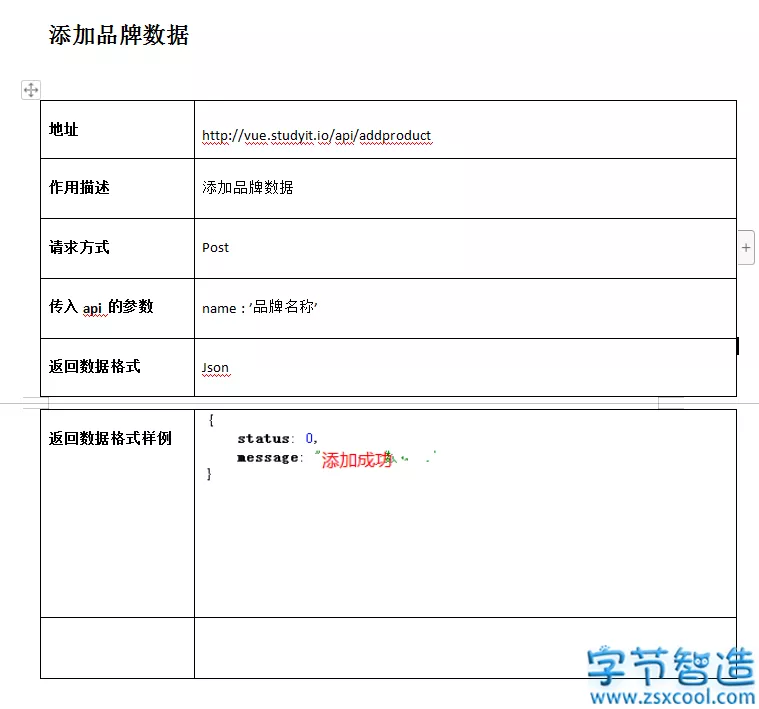
添加品牌数据接口文档
代码实现
<!DOCTYPE html>
<html lang="en">
<head>
  <meta charset="UTF-8">
  <meta name="viewport" content="width=device-width, initial-scale=1.0">
  <meta http-equiv="X-UA-Compatible" content="ie=edge">
  <title>Document</title>
  <script src="./lib/vue-2.4.0.js"></script>
  <script src="./lib/vue-resource-1.3.4.js"></script>
  <link rel="stylesheet" href="./lib/bootstrap-3.3.7.css" rel="nofollow noopener"  rel="nofollow noopener"  rel="nofollow noopener"  rel="nofollow noopener" >
</head>
<body>
  <div id="app">
    <div class="panel panel-primary">
      <div class="panel-heading">
        <h3 class="panel-title">添加品牌</h3>
      </div>
      <div class="panel-body form-inline">

        <label>
          Name:
          <input type="text" v-model="name" class="form-control">
        </label>

        <input type="button" value="添加" @click="add" class="btn btn-primary">
      </div>
    </div>

    <table class="table table-bordered table-hover table-striped">
      <thead>
        <tr>
          <th>Id</th>
          <th>Name</th>
          <th>Ctime</th>
          <th>Operation</th>
        </tr>
      </thead>
      <tbody>
        <tr v-for="item in list" :key="item.id">
          <td>{{item.id}}</td>
          <td>{{item.name}}</td>
          <td>{{item.ctime}}</td>
          <td>
            <a href="" rel="nofollow noopener"  rel="nofollow noopener"  rel="nofollow noopener"  rel="nofollow noopener"  @click.prevent="del(item.id)">删除</a>
          </td>
        </tr>
      </tbody>
    </table>
  </div>

  <script>
    // 如果我们通过全局配置了,请求的数据接口 根域名,则 ,在每次单独发起 http 请求的时候,请求的 url 路径,应该以相对路径开头,前面不能带 /  ,否则 不会启用根路径做拼接;
    Vue.http.options.root = 'http://vue.studyit.io/';
    // 全局启用 emulateJSON 选项
    Vue.http.options.emulateJSON = true;

    // 创建 Vue 实例,得到 ViewModel
    var vm = new Vue({
      el: '#app',
      data: {
        name: '',
        list: [ // 存放所有品牌列表的数组
        ]
      },
      created() { // 当 vm 实例 的 data 和 methods 初始化完毕后,vm实例会自动执行created 这个生命周期函数
        this.getAllList()
      },
      methods: {
        getAllList() {  // 获取所有的品牌列表 },

        add() {  // 添加品牌列表到后台服务器
          // 分析:
          // 1. 听过查看 数据API接口,发现,要发送一个 Post 请求,  this.$http.post
          // 2. this.$http.post() 中接收三个参数:
          //   2.1 第一个参数: 要请求的URL地址
          //   2.2 第二个参数: 要提交给服务器的数据 ,要以对象形式提交给服务器 { name: this.name }
          //   3.3 第三个参数: 是一个配置对象,要以哪种表单数据类型提交过去, { emulateJSON: true }, 以普通表单格式,将数据提交给服务器 application/x-www-form-urlencoded
          // 3. 在 post 方法中,使用 .then 来设置成功的回调函数,如果想要拿到成功的结果,需要 result.body

          /* this.$http.post('api/addproduct', { name: this.name }, { emulateJSON: true }).then(result => {
            if (result.body.status === 0) {
              // 成功了!
              // 添加完成后,只需要手动,再调用一下 getAllList 就能刷新品牌列表了
              this.getAllList()
              // 清空 name
              this.name = ''
            } else {
              // 失败了
              alert('添加失败!')
            }
          }) */

          this.$http.post('api/addproduct', { name: this.name }).then(result => {
            if (result.body.status === 0) {
              // 成功了!
              // 添加完成后,只需要手动,再调用一下 getAllList 就能刷新品牌列表了
              this.getAllList()
              // 清空 name
              this.name = ''
            } else {
              // 失败了
              alert('添加失败!')
            }
          })
        }
      }
    });
  </script>
</body>
</html>
删除品牌数据
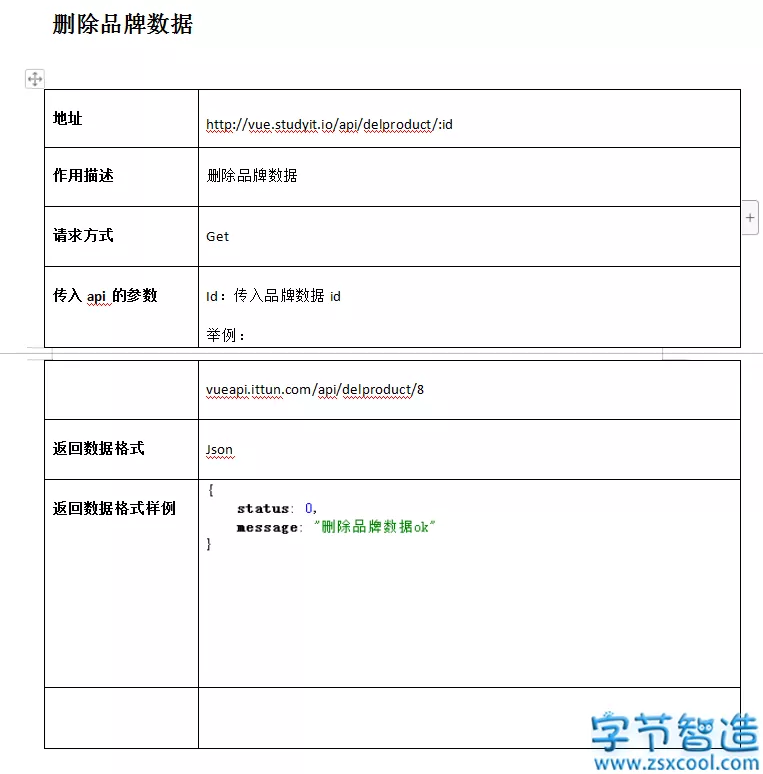
删除品牌数据接口文档
代码实现
<!DOCTYPE html>
<html lang="en">
<head>
  <meta charset="UTF-8">
  <meta name="viewport" content="width=device-width, initial-scale=1.0">
  <meta http-equiv="X-UA-Compatible" content="ie=edge">
  <title>Document</title>
  <script src="./lib/vue-2.4.0.js"></script>
  <script src="./lib/vue-resource-1.3.4.js"></script>
  <link rel="stylesheet" href="./lib/bootstrap-3.3.7.css" rel="nofollow noopener"  rel="nofollow noopener"  rel="nofollow noopener"  rel="nofollow noopener" >
</head>
<body>
  <div id="app">
    <div class="panel panel-primary">
      <div class="panel-heading">
        <h3 class="panel-title">添加品牌</h3>
      </div>
      <div class="panel-body form-inline">

        <label>
          Name:
          <input type="text" v-model="name" class="form-control">
        </label>

        <input type="button" value="添加" @click="add" class="btn btn-primary">
      </div>
    </div>

    <table class="table table-bordered table-hover table-striped">
      <thead>
        <tr>
          <th>Id</th>
          <th>Name</th>
          <th>Ctime</th>
          <th>Operation</th>
        </tr>
      </thead>
      <tbody>
        <tr v-for="item in list" :key="item.id">
          <td>{{item.id}}</td>
          <td>{{item.name}}</td>
          <td>{{item.ctime}}</td>
          <td>
            <a href="" rel="nofollow noopener"  rel="nofollow noopener"  rel="nofollow noopener"  rel="nofollow noopener"  @click.prevent="del(item.id)">删除</a>
          </td>
        </tr>
      </tbody>
    </table>
  </div>

  <script>
    // 如果我们通过全局配置了,请求的数据接口 根域名,则 ,在每次单独发起 http 请求的时候,请求的 url 路径,应该以相对路径开头,前面不能带 /  ,否则 不会启用根路径做拼接;
    Vue.http.options.root = 'http://vue.studyit.io/';
    // 全局启用 emulateJSON 选项
    Vue.http.options.emulateJSON = true;

    // 创建 Vue 实例,得到 ViewModel
    var vm = new Vue({
      el: '#app',
      data: {
        name: '',
        list: [ // 存放所有品牌列表的数组
        ]
      },
      created() { // 当 vm 实例 的 data 和 methods 初始化完毕后,vm实例会自动执行created 这个生命周期函数
        this.getAllList()
      },
      methods: {
        getAllList() { // 获取所有的品牌列表 },

        add() {  // 添加品牌列表到后台服务器  },

        del(id) { // 删除品牌
          this.$http.get('api/delproduct/' + id).then(result => {
            if (result.body.status === 0) {
              // 删除成功
              this.getAllList()
            } else {
              alert('删除失败!')
            }
          })
        }
      }
    });
  </script>
</body>
</html>


